6111 Lankershim Blvd.
North Hollywood, CA 91606
Tel. 818-761-5136 Fax. 818-761-4857
...the journey of a '77 bmw 320i from its home in california through a mild "frame on" restoration in the midwest...
Tuesday, April 3, 2012
Saturday, March 31, 2012
1987 BMW 3-Series 325i with an M3 Body Kit
So far i have spent almost $14,000 in the donor car, parts, restoration, paint, bodywork and labor...
so its not an actual m3 it is a 325i with an m3 body kit including fenders bumpers side skirts and spoiler
Sadly right now i don't have the time to put into it to finish it out, so my loss is your gain.
the pros...
i have done the following work on it :
1.- M3 replica body kit including fenders bumpers and side skirts
2.- hennarot red paint an d installation of the bodywork.
3.- installation of a great running original 325 engine with 60,000 miles
4.- new radiator installed.
5.- new tires and refinished rims with new center caps.
6.- new suede racing bucket seats black with red stitching (still in boxes not installed.
7.-new shift lever and boot.
8.-new gel racing battery.
so as you can see its the most expensive things i have done...
what it needs... the cons...
Installation of the racing seats,
the dashboard has cracks,
need new exhaust i was thinking racing headers all the way but could work with just the tip.
suspension upgrade all the way it still has all the original suspension, it is in good working order but deserves better.
needs wheel spacers or if you have the budget it could use new 17 inch staggered wheels.
brake upgrades, it does brake alright but again its not that i had in mind
it definitely needs a sound system it does not have anything not even a radio in the dash and looks tragic.
i
am running a no reserve auction cause i need to sell it really fast so
please ask questions before bidding, i could send more pictures at your
request,
Ok....
answering too much emails...
the most common:
1.- the car runs great and yes you can drive it home as well as test drive it before the auction ends.
2.- the car does not blow cold a/c and i don't know what it needs but the heat is fine.
3.-
i have uploaded pictures with the seats however they are just over the
screws, it would need bigger holes or different screws or professional
adaptation.
4.-
the car will be delivered with the original seats which are in good
condition with no big damage along with the brand new racing seats as
well.
5.-the car will be delivered with current tx stickers.
6.- i will be delivering with the car a box with lots of extra parts like a new gas pump and lots of interior pieces.
7.- tires are new all around
8.- it needs front turn signal lights and fog lights.
HAPPY BIDDING!!!
Source - http://cgi.ebay.com/ebaymotors/bmw-e30-M3-NO-RESERVE-/260990753220?pt=US_Cars_Trucks&hash=item3cc442d9c4
i have several sets of 635i/e24 rear seats that i am planning on installing in my 320i..they are a great match for the traditional recaro fronts...but...the colors are
wrong...the seats are gray one of the console is brown...i tried a leather dye
just on a fluke...i like how the gray/black cleaned/restored the
leather...
Thursday, March 29, 2012
Guibo
Pelican Technical Article:
Difficulty Level: 5
Difficulty scale: Adding air to your tires is level one Rebuilding a BMW Motor is level ten |
This article is one in a series that have been released in conjunction with Wayne's new book, 101 Performance Projects for Your BMW 3 Series.
The book contains 272 pages of full color projects detailing everything
from performance mods to timing the camshafts. With more than 650+
full-color glossy photos accompanying extensive step-by-step procedures,
this book is required reading in any 3 Series owner's collection. The
book was released in August 2006, and is available for ordering now. See
The Official Book Website for more details.
In-between the transmission output shaft
and the driveshaft, there is a flexible coupler that joins the two
together. This rubber, reinforced coupler isolates vibration from the
rest of the drivetrain, while transferring power from the engine and
transmission to the rear differential and wheels. As the car ages, and
is exposed to the elements, these discs (or guibos, as they are
sometimes called) develop cracks and begin to disintegrate. The rubber
shell is reinforced with rope cords on the inside, and it is not
uncommon to see one completely fall apart with the cords flying
everywhere. I recommend inspecting this rubber joint about every 10,000
miles or so (about once a year) to make sure that it still looks okay.
If it fails, it does have the potential to leave you stranded.
Replacement is not too difficult, but it does require that you take a
few things apart to reach the flex disc. Begin by raising the car off
of the ground and supporting it on jack stands. See the Pelican Technical Article on Jacking Up
for more information. The next step is to remove the muffler and
catalytic converter. I have found that it is best to disconnect the
entire rear exhaust system from the forward flange and drop it as a
single unit. This actually sounds a lot harder than it really is -
disconnecting the exhaust is really quite easy. See the Pelican Technical Article on Muffler Replacement for more details. Begin by unfastening the small exhaust retainer clamp from the bottom of the transmission. Figure 1 shows the underside of the car with the small exhaust retainer bracket disconnected from the transmission. Figure 2
shows a close up of the disconnected clamp. Then, remove the six bolts
from the exhaust flanges near the front of the transmission (Figure 3).
You may want to use some WD-40 or other penetrant on the bolts before
you attempt to remove them. If you have a later-model BMW, disconnect
any oxygen sensor wires that may be attached to the exhaust pipes. Now
you should be able to undo the rear muffler clamps and drop the entire
muffler/catalytic converter assembly. Be aware though - this whole
assembly weighs about 50 lbs, so exercise caution as you loosen clamps
and bolts, and drop the entire system down.
With the exhaust removed and out of the way, remove the light heat
shield that covers and protects the underside of the car. This heat
shield is made out of an aluminum-foil type of material and can be
easily unfastened from the underside of the chassis. Although not 100%
necessary, I recommend removing the lower transmission support bar at
this stage - it will make access to the flex disc a lot easier (Figure 4). See the Pelican Technical Article on Replacing your Transmission Mounts
for more details. By the way, it's also a great time to replace your
transmission mounts while you have easy access to this area.
Using some paint or white-out, mark the transmission output flange and
the driveshaft to clearly indicate which flanges connect to each other
when you reassemble the unit. Place a mark at the point indicated by
the arrow in Figure 5,
and also another mark in the same place on the opposite side of the
flex disc. This will help you align the driveshaft with the
transmission output flange later on. Also in Figure 5,
you can begin to see the flex disc start to fail - small surface cracks
have appeared in the rubber. Now, remove the bolts from the flex disc (Figure 6).
There should be six total, and they all might not be very easy to get
to. You will need a deep socket and open-ended wrench in order to get
to them. You will also need to rotate and lock the driveshaft as you
work. Release the parking brake and take the transmission out of gear,
then use your hand to rotate the driveshaft so that you can reach the
bolts and their corresponding nuts, and then re-engage the parking
brake. You will have to rotate the driveshaft three or four times in
order to remove all of the bolts.
Now, turn your attention to the rear end of the tunnel. Remove the small cross-brace that spans the driveshaft tunnel (Figure 7 and Figure 8).
This will allow you to drop down the driveshaft and remove it from the
transmission flange. Turn your attention to the rear driveshaft bearing
(Figure 9). Remove the two nuts that secure the bearing to the chassis (Figure 10),
while holding up the driveshaft with one hand. When the nuts are
removed, you should be able to drop down the driveshaft and remove the
shaft from the transmission output flange. Support the driveshaft using
a jack stand. On some cars, you may need to completely disconnect the
center driveshaft in order to remove the flex disc. If you can't seem
to get enough clearance to remove the flex disc, then follow the
procedures in our Pelican Technical Article: Rear Driveshaft Bearing Replacement. Figure 11 shows the transmission output flange with the flex disc removed.
Now that you have access to the flex disc, completely remove it from the driveshaft. Figure 12
shows a flex disc that is getting very close to failure. Since you
have access to this area, now would be an excellent time to replace and
replenish your shift bushings, or to install a short shift kit.
Figure 13
shows a brand new flex disc along with new mounting hardware. For
important parts like these, I always try to use new hardware. BMW
recommends replacing the self-locking nuts, but I also like to replace
the bolts if they happen to look like they have become slightly
corroded. Take your new flex disc and attach it onto the driveshaft.
If you look closely at Figure 14,
you will see that the flex disc has an arrow that is cast into the side
of the rubber disc. This arrow points towards where the flanges are to
be mounted. In other words, the transmission or driveshaft flange will
mate against the surface shown with the yellow arrow. The rule of
thumb is that the arrow shows which way the mounting bolts are pushed
through the flex disc.
Torque the bolts onto the driveshaft first, but only if you have enough
clearance to get the entire assembly back into the transmission output
flange. Then, move the rubber disc back up to the transmission flange
and insert the remaining three bolts, as shown in Figure 15.
Be sure to align the white mark you made on the driveshaft back up with
the matching mark you made on the transmission output flange. This
figure also shows the arrow on the rubber flex disc, in this case
clearly pointing towards the transmission output flange. With the flex
disc bolts loosely connected, reattach the rear driveshaft bearing.
Push it towards the front of the car as you tighten it down - you want
the bearing to have no slack on the rearward side (Figure 16). When the bearing is reattached, then tighten up the bolts on the flex disc.
To complete the job, reattach the heat shield, the exhaust system, and
any oxygen sensor connectors you may have disconnected.
If you would like to see more technical articles like this one, please
continue to support Pelican Parts with all your parts needs. If you
like what you see here, then please visit our online BMW catalog
and help support the collection and creating of new and informative
technical articles like this one. Your continued support directly
affects the expansion and existence of this site and technical articles
like this one. As always, if you have any questions or comments about
this helpful article, please drop us a line.
This technical article is made possible solely through the support of
Pelican Parts. If you like what you see here, then please visit our online BMW catalog and help support the collection and creating of new and informative technical articles like this one.
Source - http://www.pelicanparts.com/bmw/techarticles/E36-Guibo/E36-Guibo.htm | ||||||||||||||||||||||||||||||||||||||||||||||||||||||||||||||||||||||||||||||||||
Wednesday, March 28, 2012
Fits: BMW 3 Series E36 4 door 92-97 CHROME
(2 SETS AVAILABLE)
OR
Fits: Honda Civic Hatchback 96-00 CHROME
Aerodynamically designed M-3 style view mirror complimenting your vehicle in style and function.
Easily installed and can be painted to match the color of your vehicle.
New, still in box
Monday, March 26, 2012
from exterior to interior paint prep
the following pictures are of the current status of the restoration as the mechanicals are now rolling...the interior is in need of attention after paint...block sanded, imperfections marked with sharpie, welding euro sheetmetal, fillers/feathering...body/primer prep'ed...
a look into the past...last month i rebuilt the rear disc brakes from the 323i trailing arms, the small green case contains the tap for the brake bleeders...i clean each one...
this is the stock emergency brake...as you can see it was 'repaired'...i have an idea...this picture is of the newly installed 323i emergency brake cables...
compare the differences between the M3 S14 starter compared to the early M10 starter
| the 'repair' |
...California plate now expired...fresh baja dust...
| new output shafts installed, with fresh seals and gaskets on the untrimmed differential cover...notice the pan, the differential has an 11mm drain plug that wasn't tight...it began leaking... |
BMW Paint/Color
Korall
(Red)
BMW 020
Rez.-Nr. 3117
Rez.-Nr. 3117 (D)
| BMW | KORALL [PRIMER] | 420 | 2000 | - | SOLID |
| BMW | KORALL | 420 | 1998 | 2000 | METALLIC |
| (Bright Red) BMW 024 Rez.-Nr. 301 |
Source - http://www.rennsport.net/color_chart/color_chart.htm
![]() |
| Brilliantrot |
Models 1980- on (facelift Sept. 1979) see below
| Standard paintwork | ||||
| Colour no. | Name | Description | ||
| 012 | Sierrabeige | Beige | ||
| 016 | Iberischrot | Bright red | ||
| 028 | Phönix | Orange-red | ||
| 070 | Golf | Bright yellow | ||
| 085 | Chamonix | Cream white | ||
| 086 | Schwarz | Black | ||
| 140 | Biskayablau | Medium blue | ||
| 141 | Zederngrun | Medium green | ||
| 142 | Sepiabraun | Dark brown | ||
| Metallic paintwork (clearcoat) | ||||
| 013 | Topasbraun-metallic | Medium brown / copper | ||
| 018 | Rubinrot-metallic | Medium red | ||
| 037 | Fjord-metallic | Light blue | ||
| 045 | Arktisblau-metallic | Dark blue | ||
| 055 | Antrazitgrau-metallic | Dark grey | ||
| 060 | Polaris-metallic | Grey / silver | ||
| 064 | Turmalingrun-metallic | Medium green | ||
| 075 | Resedagrun-metallic | Light green | ||
| 143 | Kaschmir-metallic | Gold | ||
| Upholstery colours – available in cloth and leatherette | ||||
| Cloth | Leatherette | Name & description | ||
| 0075 | 0005 | Schwarz – black | ||
| 0076 | 0006 | Marineblau – blue | ||
| 0077 | 0007 | Nylonbraun – beige | ||
| 0078 | 0008 | Hellgrau – grey | ||
| 0079 | 0048 | Farngrun – green | ||
![]() |
| MX5 True Red |
![]() |
| 016 iberischrot |
Sunday, March 25, 2012
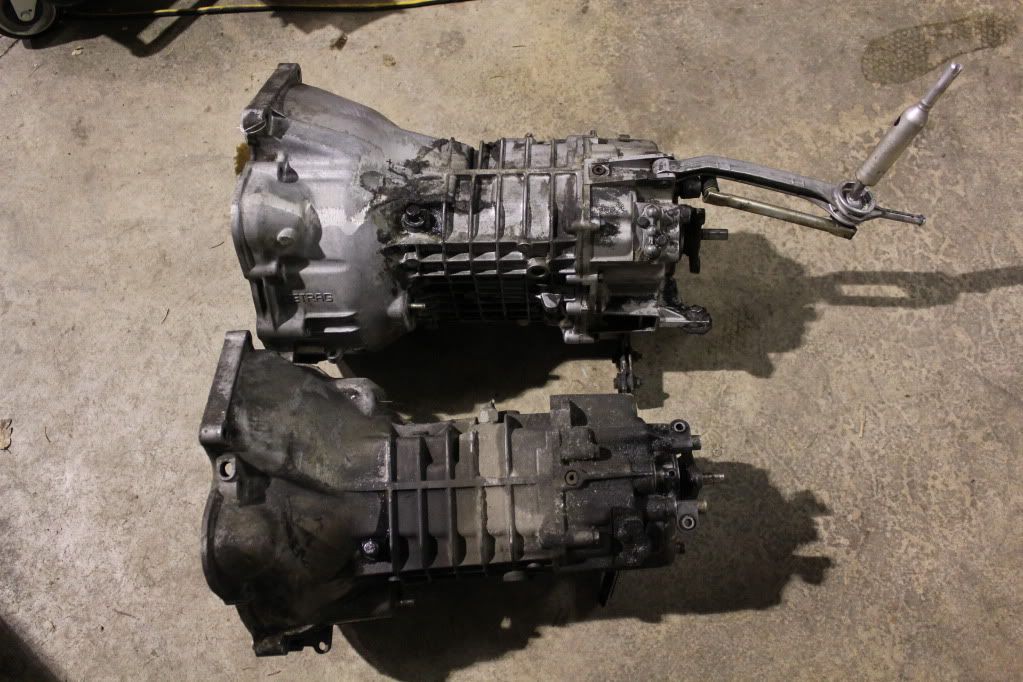
G240 Transmission from an 1983 E21
it's a G240 from a 83 E21. it will not bolt up to a M42, only the M10. it does have a speedo drive.
the way you can tell is the shifter. the M42's G240 uses the beam type shifter like shown on the G260, but the M10's G240 uses the sheetmetal shifter with 2 mounting bolts. also the M42 has 2 rear trans mounts, the M10 has only one.
i payed $50 for one. the E21 guys don't want them because. * you have to source a 83 driveshaft, * the G245 is a stronger box. the reason i bought one is to swap the tail section onto my M42's box so that i have a speedo drive.
the G260 E21 would use the sheetmetal shifter [bottom]. so what is pictured is a E21 G240 and a E30 G260.
Your transmission is worth something to 83 owners, since it's harder to find these than the G245. Some 2002 owers use them for swaps too, but the 245 is more popular with them.
the way you can tell is the shifter. the M42's G240 uses the beam type shifter like shown on the G260, but the M10's G240 uses the sheetmetal shifter with 2 mounting bolts. also the M42 has 2 rear trans mounts, the M10 has only one.
i payed $50 for one. the E21 guys don't want them because. * you have to source a 83 driveshaft, * the G245 is a stronger box. the reason i bought one is to swap the tail section onto my M42's box so that i have a speedo drive.
the G260 E21 would use the sheetmetal shifter [bottom]. so what is pictured is a E21 G240 and a E30 G260.
Your transmission is worth something to 83 owners, since it's harder to find these than the G245. Some 2002 owers use them for swaps too, but the 245 is more popular with them.
__________________
Tom D
77 e21 - m42
88 e30m3
04 330 dinan3
84 r1000rt
02 r1150rs
all of them gray
77 e21 - m42
88 e30m3
04 330 dinan3
84 r1000rt
02 r1150rs
all of them gray
Layne - The "G240" etc tells you what gears are inside the box. It doesn't tell you what engine it fits. In the same way, there's a G245 for M10's and a G245 for M20's. This leads to assumptions such as Bflan made above that it's the same transmission and it is not. NO 92mm bore spacing engine (M42, M20, M50/52, S52/54) with interchange transmissions with any 100mm bore spacing engine (M10, M30, S14, S38). M10 and M20 bell housings are exactly the same shape, but slightly different size.
LJ851 - there is an easy way to determine M10 vs M20 and that is the distance between the upper two bolt holes below the cylinder head M20 has a much wider spacing than M10.
Source - http://forums.bimmerforums.com/forum/showthread.php?t=1775334
Friday, March 23, 2012
Thursday, March 22, 2012
Wednesday, March 21, 2012
Monday, March 19, 2012
Sunday, March 18, 2012
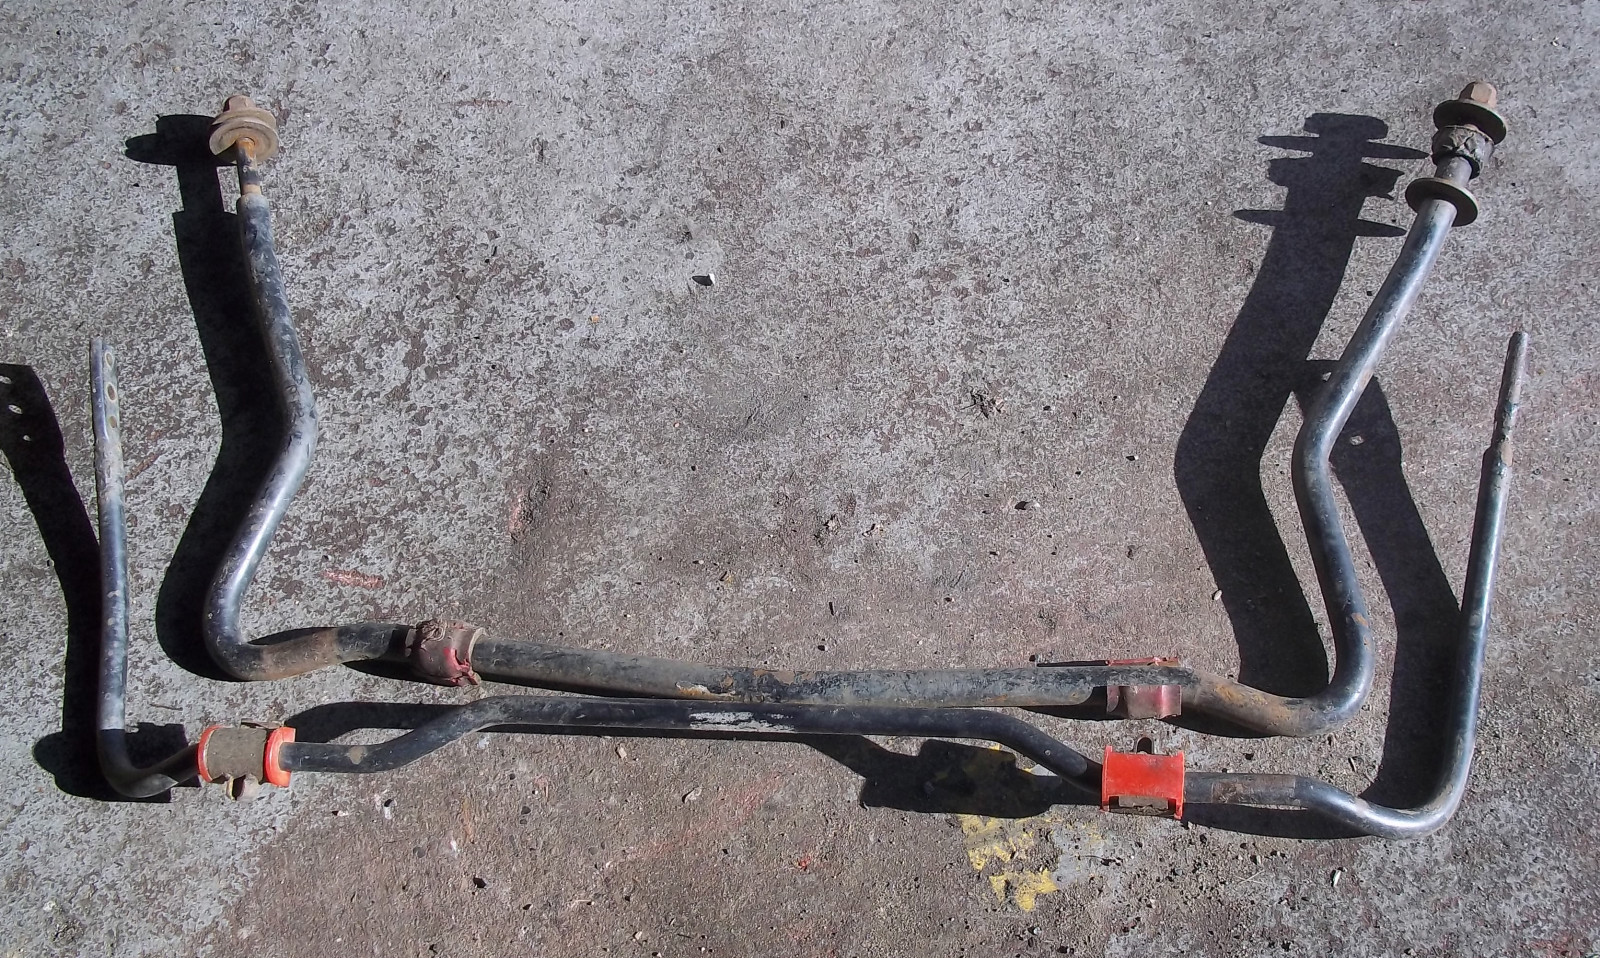
front/rear sway bars
![]() |
| stock rear sway bar is 16mm...the upgraded ST rear sway bar is 19mm...the upgraded ST front sway bar is 25mm...the stock '77 front sway bar is |
SUSPENSION TECHNIQUES
with polyurethane bushings
Front bar - 25.8mm
3 Way Adjustable rear bar - 19.6mm
MSRP: $335.00
Item Part Number: 52005
Vehicle Application: BMW E21
Measurement: L X W X H:47.125 21.5 4.875
Item Part Number: 52005
Vehicle Application: BMW E21
Measurement: L X W X H:47.125 21.5 4.875
1" front bar diameter
3/4" rear bar diameter
ST Suspension now offers one of the best anti-sway bar kits on the
market. Reduce your vehicle's body roll and increase the gripping power of
your tires with a set of ST Suspensions (subsidiary of KW Automotive) anti-sway bars which are engineered to give you the best performance
possible.
The cold formed steel sway bars are powder coated for durability which
also prevent rusting and come complete with durable polyurethane bushings
and all hardware needed for the installation.
These kits are guaranteed to improve vehicle handling. Each kit is
designed for both street and/or competition applications. Comes with both
front and rear sway bar.
ST Suspension are manufactured in the USA!
Wednesday, March 14, 2012
Cheap in tank pump alternative
If your in-tank fuel pump is bad and you're cheap like me, this might be a good solution. This will only work if the pump is bad but the bracket that it mounts to is still good.
Before assuming the pump is bad, use a multimeter to make sure it is actually getting voltage.
The pump used is an Airtex E3900. The specs match the factory pump specs pretty closely (flow rate and size). I got mine on eBay for $25 and I've seen several others on there for $50 or less. The strainer I used is for a '77 Chevy Vega. I got it at ABC Auto for about $8.
Here's what you need:
- Airtex E3900 fuel pump
- strainer
- (1) large hose clamp, about 2"
- (2) small hose clamps, about 1"
- some electrical wire
- (2) ring style electrical connectors
Here's the factory pump and the Airtex pump side by side for comparison.
Before assuming the pump is bad, use a multimeter to make sure it is actually getting voltage.
The pump used is an Airtex E3900. The specs match the factory pump specs pretty closely (flow rate and size). I got mine on eBay for $25 and I've seen several others on there for $50 or less. The strainer I used is for a '77 Chevy Vega. I got it at ABC Auto for about $8.
Here's what you need:
- Airtex E3900 fuel pump
- strainer
- (1) large hose clamp, about 2"
- (2) small hose clamps, about 1"
- some electrical wire
- (2) ring style electrical connectors
Here's the factory pump and the Airtex pump side by side for comparison.
Make sure the place where the ground wire attaches to the bracket is clean. The bracket shown had been sitting in gas for two years.
The Airtex pump is more or less a direct fit so there's no modification necessary. Just put the strainer on the pump and attach the pump to the short rubber hose on the bracket. Use the large hose clamp to secure the pump to the fuel return line. Use the small hose clamps on the short rubber hose. The clamps aren't there from the factory but mine leaked without them. The hot wire should reach the pump as it is. You'll have to cut a short length of wire to use for the ground wire. Here's the finished product.
notable member comments included - ''It would be neat to get the actual in tank fuel pump that has broken for some reason,,then just do a switch of the broken fuel pump with new good identical replacement, its possible it can be ordered,, the prices of these in tank fuel pump entire units are for the rich and famous,,lol,,good effort saving money is always a good idea, the money saved can be used to buy other needed parts, saved or used elsewhere.....
I have not built one of these yet however I understand it.
Okay heres what I have found so far:
Airtex E8196H: GPH Wide Open--45-60, Ground--NEG,Location-IN-TANK, PSI Shut Off-2.5-5.5, Type--CENTRIFUGAL, Volts--12-- for 80-83 BMW 320i ,ect
I found Airtex E2008 psi 5-7 30-40 gph,,Strainer Part Number: FS1, FS3, FS22,,specs from AutoZone, $40.79 at rockauto
The Hunt is on for the inexpensive in tank fuel pump to avoid paying the rich and famous prices.''
Product Details
Sub Type: Electric Fuel Pump
Notes: GPH Wide Open--20-35, Ground--NEG, Location--IN-TANK, PSI Shut Off--4-6, Type--PERIPHERAL, Volts--12
COSWORTH VEGA FUEL PUMP 1975 1976 ELECTRIC IN TANK PUMP AIRTEX E3027
I have not built one of these yet however I understand it.
Okay heres what I have found so far:
Airtex E8196H: GPH Wide Open--45-60, Ground--NEG,Location-IN-TANK, PSI Shut Off-2.5-5.5, Type--CENTRIFUGAL, Volts--12-- for 80-83 BMW 320i ,ect
I found Airtex E2008 psi 5-7 30-40 gph,,Strainer Part Number: FS1, FS3, FS22,,specs from AutoZone, $40.79 at rockauto
The Hunt is on for the inexpensive in tank fuel pump to avoid paying the rich and famous prices.''
Product Details
Sub Type: Electric Fuel Pump
Notes: GPH Wide Open--20-35, Ground--NEG, Location--IN-TANK, PSI Shut Off--4-6, Type--PERIPHERAL, Volts--12
COSWORTH VEGA FUEL PUMP 1975 1976 ELECTRIC IN TANK PUMP AIRTEX E3027
the members continued....''I have looked around also for just the replacement fuel pump only as well so far not able to find it. Its a low pressure fuel pump with sizeable gph rating. Airtex fuel pumps from what i have found are made in china,,its possible it will show up,,the little fuel pump in the in tank unit sold by Airtex for 80-83 BMW's 320i should have an Airtex number,,so far though its not listed,,VDO and Siemens/Westinghouse the same.
I have this unit complete,little fuel pump is kaput ,,what I'm considering also is too remove the little fuel from the below unit( got this one at pic-n-pull for a song and dance some time ago) and send it in to K Jetronic fuel pump rebuilder and then reinstall it,,you can have your rebuilt too,,,definately save some gold and silver coins this way....lol
Off the subject I'm considering going to Pic-n-pull and bag the twin tanks, then do a POR15 clean and seal job and have super clean fuel system...until then ect,,change fuel filters every 6 mos is a possiblty rather than yearly. Here hazardous waste disposal is no problem,,just drive in n drop off at the transfer station for this in a sealer container. Thats Helmut Koinigg in the BMW-Alpina Build.''
I have this unit complete,little fuel pump is kaput ,,what I'm considering also is too remove the little fuel from the below unit( got this one at pic-n-pull for a song and dance some time ago) and send it in to K Jetronic fuel pump rebuilder and then reinstall it,,you can have your rebuilt too,,,definately save some gold and silver coins this way....lol
Subscribe to:
Posts (Atom)