1980 Toyota Land Cruiser
1980 FJ40 35" MICKEY THOMPSONS, CHROME WHEELS, OX WINCH, ROLL CAGE


|
Thread Tools

|
Search this Thread
|
|
#1

|
|||
|
|||
|
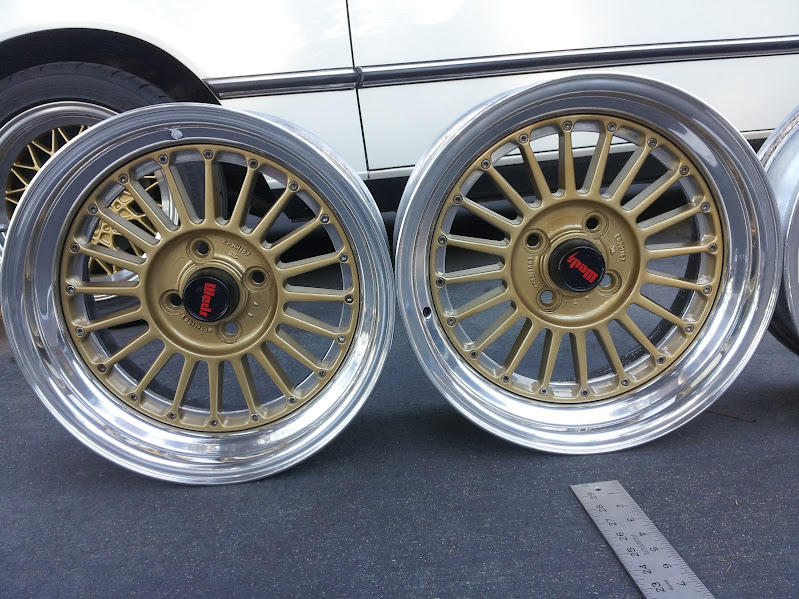
F.S. Weds Bavaria 15x6.5, 15x7 et16
Set of 4 Weds Bavaria Wheels staggered 15x7 and 15x6.5. The offset of all wheels is about 15.875.
I set one 15x6.5 on a scale and it weighed 13.6 lbs. More pics available if interested. These are 2 piece wheels. They started life as a 3 piece but were welded together at the factory by Weds. The centers can be unbolted for refinishing etc. $1,000+ shipping. Local pickup preferred in 92084 but I can bring them to Socal Vintage if a deal is struck ahead of time. I just shipped a similar set to Ohio and it ran $100 fully insured. There are 2 spots that were repaired. I've taken a number of pics of the repaired area. The lip appears to have had some curb damage that was ground down and polished leaving a "dip" in the lip of one wheel. I have shot 3 angles of that area which is included in the web album for viewing. Second repaired area is at the back of one barrel and appears to be a bend that was hammered back into place. Looks ugly but appears straight. No cracks. The lips are polished and the rears could use a cleaning. The centers where recently repainted gold. The caps are a mix and the previous owner attempted to make "weds" stickers which look good in pics but are starting to peel. Regarding the offset. by my measurements the wheels measure 7.5in(190.5mm) to the outer edge. from the back of the hub to the edge of the wheel they measure 4.375in(111.125mm) 190.5/2 = 95.25-111.125 = -15.875 so I guess they are et15.875 correct me if i'm wrong. Thanks for looking. 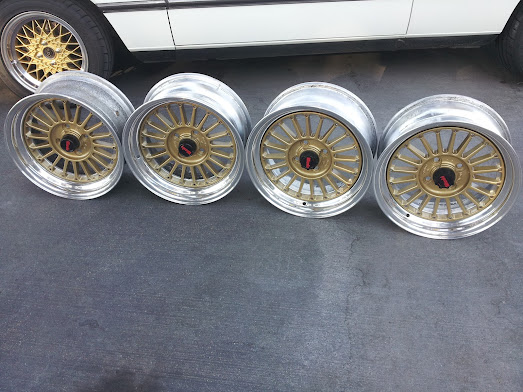 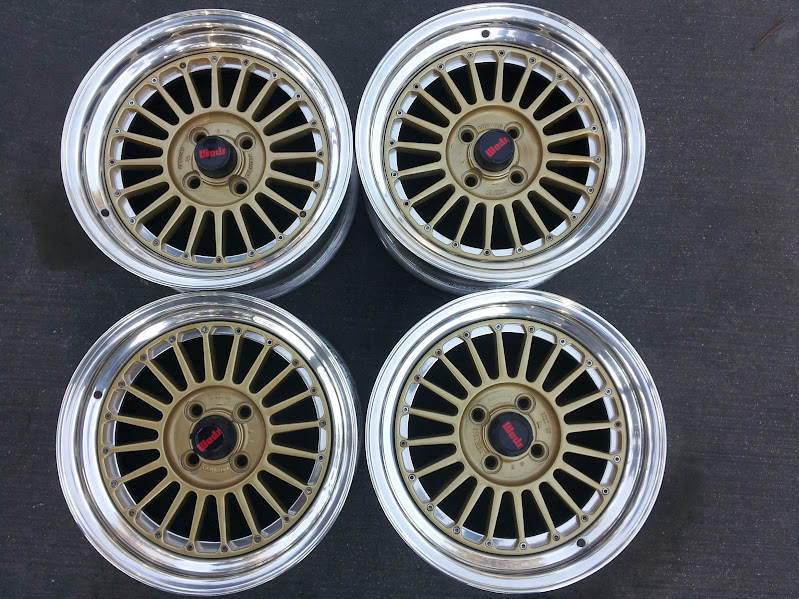 Backside  15x7 rears |


 und wurde in den Dreißiger Jahren vor allem für Jagdflugzeuge gebaut.
Messerschmitt, Heinkel oder die Flugboote von Dornier setzten auf das
Stahlgebirge aus Bayern, das beim Start 750 PS und im Reiseflug gut 500
PS leisten konnte. Und zwar ohne dass der Drehzahlmesser über 1500
Touren ging. Nur beim Sturzkampf waren kurzfristig 2000 Umdrehungen
drin.
und wurde in den Dreißiger Jahren vor allem für Jagdflugzeuge gebaut.
Messerschmitt, Heinkel oder die Flugboote von Dornier setzten auf das
Stahlgebirge aus Bayern, das beim Start 750 PS und im Reiseflug gut 500
PS leisten konnte. Und zwar ohne dass der Drehzahlmesser über 1500
Touren ging. Nur beim Sturzkampf waren kurzfristig 2000 Umdrehungen
drin.


 and was built in the thirties especially fighters.
Messerschmitt, Heinkel and Dornier flying boats that sat on the steel
mountain of Bavaria, which was at the start of 750 hp and cruise afford
good 500 horsepower. And this without the tachometer went over 1500 tours. Only when falling short battle 2000 revolutions were inside.
and was built in the thirties especially fighters.
Messerschmitt, Heinkel and Dornier flying boats that sat on the steel
mountain of Bavaria, which was at the start of 750 hp and cruise afford
good 500 horsepower. And this without the tachometer went over 1500 tours. Only when falling short battle 2000 revolutions were inside. | Written by steve kupper | |
| Sunday, 08 March 2009 | |
|
Use DOT 3 brake fluid. Use only brake fluid that has not been
opened. Brake fluid absorbs moisture, moisture boils before brake fluid,
boiling water does not stop 2002s.
Three pints should be on hand to change out the brake and clutch systems.
Three methods discussed.
Gravity
1. Fill the reservoir, open the bleed screws and let the brake fluid leak everywhere overnight.
Old fashion way - need a partner or helper.
1. Protect the area around the reservoir, brake fluid removes paint, unpainted metal rusts.
2. Fill the reservoir with fresh brake fluid.
3
Start at the right rear. Get a big bottle with a hose to it. The hose
needs to be the size that will fit tightly over the bleeder screw. Here
is what I use.

The
bottom of the jug should have some fluid in it. Keep the tube submersed
in the old fluid to keep air from being sucked back into the system.
4. Put the closed end side of a 8mm or 7mm wrench on the bleeder screw then put the hose over the bleeder screw.
5. Ask your helper to get in the car, pump the brakes slowly five times and on the fifth time hold to the floor.
6.
While the brakes are held, quickly release the bleed screw a bit and
watch for bubbles. Quickly close (after counting one-thousand one one
thousand two) the bleeder screw and tell the helper they can release the
brake. Get this sequence absolutely correct. Pump, Hold, Release and
close the bleeder screw, then and only then, release the brake pedal.
7. Repeat the process until you do not see any bubbles. Use a good light near your work so you can see the bubbles.
8. Keep checking the level of fluid and top off as needed.
9. Repeat the process on the driver's side rear.
10. Now move to the passenger's side front. Bleed in the same manner in the sequence of Upper, Inner and Outer (UIO)
11. Move to the driver's side and bleed like the passenger's side front.
12. Always checking the level of fluid in the reservoir and topping off as needed.
Power Bleeder method.
1. Same as the old fashion method but you need a power bleeder and the helper can go fix dinner.
2. Fill the reservoir.
3. Attach the power bleeder to the reservoir and pump to 10-15 psi.
4.
Bleed as old fashion way, (no pumping the brake pedal with the power
bleeder) keeping an eye on pressure and fluid in the reservoir.
Note: some folks fill the bleeder with fluid, I do not.
I guess there is another way but I do not know how to do that. That method uses a vacuum tool like a Mighty Vac
Brake fluid is nasty stuff, clean up real good and through away the rags or wash them good before you reuse.
|
| Written by BillWilliams | |
| Sunday, 08 March 2009 | |
| Mike taught me a way to bleed the clutch system on a five speed that makes things pretty simple.
Get a pump type oil can from your local hardware,dedicate it to
brake fluid. Put a section of tubing on it that fits the spout on the
oil can and the bleeder screw.

Fill
the can with your favorite brake fluid, connect the tubing to the
bleeder screw, crack the bleeder screw open and start pumping.
Have an assistant watch your reservoir to let you know when the reservoir is full and no bubbles.
Close the bleeder screw.
Bob's your uncle.
|
| Weber Downdraft Carburetor Installation Guide |

|

|

|
| Written by Glenn Stephens and Rob Shisler | |
| Saturday, 03 September 2005 | |
|
Introduction:
This article deals with the most commomly upgraded-to '02 downdraft
carburetors, the Weber 32/36 and the 38/38. The carbs are named for
their throttle diameters in millimeters. The 32/36 is also a sequential
carb, meaning that first the smaller 32mm throttle butterfly opens,
then as the throttle is opened further the second, 36mm throttle opens.
On the 38/38, both 38mm throttles open simultaneously, giving smoother
overall response and more power.
Choke Types:
There are three popular types, designated by the : manual choke (designated
by the model suffix DGx), water choke (DGAx), and electric choke (DGEx).
Because fuel does not atomize well when the motor is cold, the choke's
purpose is to enrichen the mixture during those cold starts by cutting
off the supply of air. On the 32/36 and 38/38 downdraft this is accomplished
by the square butterfly valves at the top of the carb inlet. The throttle
plates themselves are at the base of the carb.
Manifolds:
Manual Choke: The manual choke has a cable-actuated mechanism allowing the driver to manually set the amount of choke they need for cold startup. Many people prefer them for their simplicity and the level of control. When installing or adjusting a manual choke cable, obviously the idea is to allow for a full range of movement of the choke plates, from wide open to snapped shut. The only connections to a manually choked carb are a vacuum takeoff for the distributor (optional), and the choke cable itself. There is a kit available to retrofit the 32/36 either electric or water choke with a manual control, and this kit also works with the 38/38. Water Choke: The water choke is semi-automatic. To activate it, you depress the accelerator all the way which causes the choke cam to catch with the butterflies closed. Water from the engine block is run into the choke housing which heats the mechanism and allows the choke to open as the engine warms up. The water choke requires a small water hose to the engine block and the manifold. There are an optional electrical connection to a solenoid which goes to a temperature sensor in the manifold, and a vacuum port for the distributor. Electric Choke: The electric choke is essentially a timing circuit made of a bi-metal coil attached to the choke pivot. When you turn on the ignition on a cold morning, the choke is normally closed. As the electricity begins to heat the coil, it slowly contracts and opens the choke plates. Thus it is important to avoid leaving the ignition on on a cold morning without starting the car because you will open the chokes without realizing it, and thus make it harder to start when you finally do try to start it. The electric choke requires, not surprisingly, a 12-volt ignition-switched and fused source. The easiest places to get + 12v for a car not normally equipped with an electric-choked carb is from the + side of the coil, or from the #12 fuse (later 12-fuse cars) or #11 fuse (early 12-fuse cars) or the + terminal of the coil. There is a vacuum advance port for the distributor (optional). To adjust the electric choke, with the air cleaner off and the car cold, loosen the 3 screws surrounding the plastic cover of the electric choke mechanism. Rotate the plastic cover until the choke butterfly valves are just closed. This is the choke position. Start the car and get it to idle. As the choke and the car warm up, the butterflies should open to a straight up position - takes about 5 minutes. If they open all the way, then tighten down the 3 screws and you are good. If not, turn the plastic cover until they are straight up, then tighten.
There were two types of double-barrel manifolds that originally came
on '02s: the "Peanut" manifold and the regular two-hole one.
These were both designed for the 32/36. In addition, there was a performance
manifold made for these cars back in the day by Cannon for people who
upgraded to 38/38s or 40/40s. This manifold was "Hogged" out
so that instead of two seperate holes, or a single peanut-shaped hole,
there was a single large oval hole for better airflow. It is pretty
easy to make this modification to either of the stock-type manifolds.
Any type of carbide metal cutting tip for a die grinder will do the
job, or a jigsaw/carbide grinder tip combination. Just cut the basic
shape clean with a jigsaw (make sure the blade wont bottom out inside
the manifold!) and then use the carbide grinder to clean up things.

"Hogged" intake manifold and stock two-hole.

Stock "peanut" style manifold.
Manifold Connections: The manifold has two large water inlets, one the bottom and one on the firewall side. These are used to circulate water through the manifold which are designed to help with fuel vaporization during engine warm up and in cold weather. Hot-weather enthusiasts often just bypass them, but early-risers who have to drive to work in the cold would do well to keep them connected. Typically there is also a small water nipple on the end of the manifold that is used as one of the connections for a water choke. In other applications you can cap this with a bolt and copper washer or run a hose to the connection on the rear of the engine block. There are lots of little nipples on the later manifolds used for vacuum connections for the emissions systems. Again, depending on your local smog laws, you may want to remove all that stuff and block them off with rubber caps or plugs. There is a large nipple that should be connected to your brake booster with a check valve in the middle. The valve should be situated so that vacuum can be held in the booster after engine shutdown. Between the 3rd and 4th intake runner is a threaded hole where the sensor for a water choke solenoid can go. Other applications can remove the sensor. On the bottom of the later manifolds is a temperature switch which is used for emissions. It is a wet connection so if you are desmogging, either leave the sensor unconnected or plug it with a bolt and copper washer. 
Later-model Emissions Loom that is replaceable by
single wire from #12 fuse to + side of Coil.
To remove the manifold, disconnect all the hoses and remove the 12mm nuts from the studs. There is another bolt that attaches to the starter. There is no need to pull the starter. Some of them are tough to reach but just be perisistent. LABEL all the wires and hoses you intend to keep, and once they and the fasteners are removed, the entire manifold/carb assembly will pull right off. Linkage: Most carb kits come with a proper linkage for your vehicle, but you may find yourself adapting your old linkage or using or making your own cable linkage. 
Stock-style rod linkage installed on 38/38 carb.
For a stock shaft-style linkage, adjust the throttle control shaft (carb to firewall shaft) so it is level and straight - inline with the carb. This is done with the pivot bracket on the firewall. Then adjust rod end (on rod coming up from pedal box to control shaft) to achieve full throttle opening when depressing gas pedal. You can look through the windshield at the rear of carb to confirm full opening. Place the spring as shown with the long arm down and hook toward the engine bay so that it does not catch on the heater hose. 
Rod-type linkage at firewall.

Rod-type linkage at carb.
If you are replacing the stock shaft linkage with a cable setup, Rob suggests making your own from commonly-available bicycle cable parts and perhaps some hand-made cable "stays." What you need is about two feet of cable including the shroud (get high-end teflon-lined cable), two metal brackets that you can make yourself, and two adjustable cable housing retainers such as you find at the end of the cable shroud on a bike brake cable, for example. You will also need the two cable clamps that hold the actual cable itself to the end of the lever arm attached to the throttle pedal, and the one that attaches to the throttle mechanism on the carburetor itself. 
38/38 Carb and Cable Linkage Detail

Fuzzy pic of Lower Cable Stay Bracket.
The lower cable stay is bolted to brake booster bracket via the large
main bolt that holds the upper pedal box "arms" in place.
A simple 90-degree angle and hole set the cable end above the arm attached
to the throttle pedal. You will need a similar type of rotating cable
end clamp to fit in the hole at the end of the throttle arm as you have
for the throttle mechanism at the carb itself. Please note in the picture
of the lower stay (above) that the cable exits the lower stay at a severe
angle. This is the way the thing was installed in my parts car, and
it, among other problems, caused severe binding.
When I moved the cable setup to my project car, I fixed all these details and "tuned" the operation of the cable (shortening it, and chamfering the outputs of the cable housing end holders) itself so that only the carb spring itself would pull the cable up and close the throttle. I also actually used two more springs (one at the pedal box and an additional one at the carb) as failsafes, however, but its nice to have a nice, smoothly operating cable without any binding. Overall, the kit produced by a well-known Southern California (non-'02-specific) performance tuner that I inherited in my parts car, and its subsequent installation by a well-known local independent BMW shop, were of such alarmingly poor quality that the throttle would often bind up and not close fully even with ALL THREE springs installed. No more of that! Jetting and Tuning:
First let me (Rob) ask everyone who knows what their
carb setup is to PLEASE email your jetting, cam, compression, exhaust
system, and displacement information, as well as comments about how
the engine performs, to
Tom Kent
,
who is the FAQ site's Jetsmaster. He is compiling a database of various
setups and we would like to include this information in an appendix
to this article for reference purposes (obviously). Its YOUR help in
this that makes this site work the way it does. THANKS IN ADVANCE!!
Carbs must be jetted to match the performance characteristics of your
other engine and exhaust modifications (compression, header, cam, etc.)
There are 3 kinds of jets on a downdraft Weber: Idle, Main, and Air
Correction Jets. The idle jet can be changed easily but main and air
correction jets require you to unhook the choke lever (small circlip),
remove the 6 screws on top of the carb, and pop the top. 
Idle Jet Location for Weber Downdraft Carbs

Main and Air Jets Locations Inside Carb Assembly
Tuning a carburetor can be a maddening and very rewarding experience. As of this writing, we can only offer advice on how to diagnose and suggestions on how to tune your Weber downdraft. Eventually, the FAQ will have the aforementioned Setup Database that will allow you to simply match your engine/exhaust specs to a table, and chose the Jetting setup that looks like the best match. Of course all engines are different, but this will help to give a lot of people a head start in fine-tuning their performance. Understanding how to tune a carburetor begins with understanding the basics of air-fuel ratio as it relates to car engines. Gasoline vapor burns most efficiently at a ratio of 14 parts air to one part of fuel. This "ideal" ratio is often referred to as "Lambda." However just because this is the most efficient ratio, doesn't mean it is the TRUE ideal for your particular application. Modern fuel-injected cars often run at VERY lean settings of 16:1 or more while just cruising along, but can also instantaneously adjust themselves to much more powerful settings of as little as 12:1. (More fuel per unit of air produces more power, up to a certain point). With carbureted cars, this level of electronic adjustability isn't available so we have to set up our cars based on our usual driving style or, for enthusiasts, to produce the most power (or some trade-off therein). It is important to know that a carb that is running too lean will tend to "race" or "surge" as you accelerate through the powerband, whereas one that is set up to run too rich will tend to "bog" or "stumble." Knowing those characteristics will help you to diagnose and tune your own setup. If your carburetor was shipped from a dealer that knows '02s, it is highly likely that it is set up for at least a stock '02 configuration. This can provide you with a good baseline for making subsequent adjustments. Certain vendors can in fact set up a carb based on their experience for whatever setup you happen to have in your car. Carbs "rescued" from a junkyard, e-bay, etc., however, may have been set up for any number of different situations and may require extensive tuning. Furthermore, enthusasts who change other aspects of their engines' performance hardware will always want to re-jet for the new changes. 
Proper kink-free installation of Fuel Line from stock
Mechanical Fuel Pump
What follows are links to several online sources of MUCH more extensive info on how to tune a carburetor for various setups. Also please note that the FAQ Store now carries a full line of NEW Webers, parts, jets, RamFlo Air Filters, etc., at super-low prices, and the profits from any sales help to keep the FAQ site going! And, as always, if you have any questions or comments, please feel free to post them to the Message Board! |


