Guidance on identification
Changes made during the production
During the years of production, changes to the E21 3 Series have been countless. As is customary today, in September of each year, ie at the beginning of what usually is called the year of production, the production model was launched the following year (model year), to which no changes were more or less great. This model remained in production until August next year, the month in which production was reduced to a minimum to allow production lines to prepare for the next model year. Besides this, it was common during the production years were other changes, often invisible to the customer, but is no trace of them in the catalogs of spare parts and repair manuals.
Sometimes these changes respond to the needs of technical / functional, in other cases they were involved in the transition to another supplier of components, usually new details were interchangeable with the previous ones and sometimes the particular change has supplanted the predecessor, in the warehouses of spare parts.
In order to provide rational guidance, two tables have been prepared in pdf format and can be viewed by clicking on the links in blue.
The first table provides an overview of the main features of each model year and the changes made during production of the E21 3 Series perceptible "at a glance", ignoring the changes "under the skin", for which see the second table . Excluding special series, for which see the page "The 3 Series E21 limited edition".
It may be useful in assessing the originality and conformity with the specifications of a specimen in relation to the date of construction. It should however keep in mind that the changes indicated in the table are not always entered into production in September of each year, coinciding with the start of production of the new model year, but frequently the first samples of each model year were equipped details such as knobs, levers , switches, etc., which were remnants of the previous year's production. Before moving to the assembly of new details, in fact, had to use up stocks of old ones, a practice that was common to other homes.
Other aesthetic changes were made during the production: the first case is that the plastic strip between the tail lamps, mounted in January 1976. The exhaust was introduced right from the beginning of 1978, coinciding with the start of the actual production of the 323rd, until then, the cars, including the first 320 copies of the new M60 and those of the pre-series 323i, mounted even before the terminal-shaped "S". The same goes for smaller headrest and smooth shape, appeared in early 1981 to coincide with the arrival of the 315, so far the shape of the head restraints had been that of the model year 1980 (the "ears" on either side ), but coupled with new interior trim.
The second table is aimed at more specific information and contains a list of changes made to the car, indicating the date of entry into production. Were not considered changes to equipment and accessories, to which reference is made to the respective page of this section.
Recognize the special
A list, as precise and detailed, can not be sufficiently comprehensive to know in detail the changes that continued over the years, to verify the originality of a car or to make a correct restoration. The following photographs can give a help in this respect, for convenience we are limited to the visible details of the standard production version for sale in Italy. For other models (U.S. versions, special series, etc.), please refer to the respective pages of this section.
It should also be borne in mind that during summer 1976 in Germany (and perhaps in other countries, but is not in Italy) has called the BMW 3 Series dealerships to submit them already in circulation for some updates, some already made in the first months of production, while others would be arriving shortly thereafter with the model year 1977. The tables below details in question are marked with an asterisk: if you should happen to run into a car model year 1976 to date, must therefore be considered as original.
BODY
BMW EMBLEM ON THE HOOD ENGINE
 |
| Up to model year 1979, with letters and borders in relief |
 |
| Starting in model year 1980, completely smooth and glazed |
FRONT KIDNEY GRILL
 |
| Up to model year 1979 |
 |
| Up to model year 1979 |
 |
| Starting in model year 1980: more sloping and less rounded edges |
 |
| Starting in model year 1980: more sloping and less rounded edges |
FRONT INDICATORS
 |
Model year 1976
(Only for vehicles for Italy) |
 | | | |
| Starting in model year 1977 | |
FRAME FRONT OF LIGHTS
 |
| Model year 1976: Plastic Chrome |
 |
| Starting in model year 1977: plastic painted in metallic silver |
CORNER OF THE FRONT BUMPER
 |
| Up to model year 1982, with the chrome strip that covers the junction |
 |
| Model year 1983: no chrome strip |
FRONT VALANCE
 |
| Up to model year 1979, with large air intake and covered by a grid |
 |
| Starting in model year 1980: the lower lip is more pronounced, and the intake air is small, and devoid of the central grid, the plate is shaped at the sides and the two blacks mustache stickers |
FOG LIGHTS
 |
| Up to model year 1978: on the right side of the hood with a black background |
 |
| From model year 1979, no black background |
|
WRITTEN ON THE IDENTIFICATION OF THE BONNET BOOT FOR SAMPLES WITH AUTOMATIC TRANSMISSION
 |
| Up to model year 1977: in addition to the identification code of the model, says "Automatic" with black background on the left side of the bonnet |
 |
| From model year 1978: no written (only the identification code on the right side of the model, when present) |
REAR LIGHTS
 |
| Up to model year 1979, with the reflective gem in close proximity to the direction and without housing for rear fog light (on request), located below the bumper near the exhaust pipe. NOTICE - It's easy to tell the difference between the two style lens, late style has the reflector in the center and early style has it off to the side. If you swap the housings too you can use either one in any car, the cutout in the body is the same. |
 |
| From model year 1980, with the reflective gem in the middle of the red zone and housing for the rear fog light (optional for 315) |
PLASTIC RIBBED STRAP BETWEEN THE REAR LIGHTS
 |
| Until January 1976: absent (*) |
 |
| Since January 1976 |
ANGLE OF REAR BUMPER
 |
| Up to model year 1982, with the chrome strip that covers the junction |
 |
| Model year 1983: no chrome strip |
BOTTOM BANNER - BACK
 |
| Up to model year 1979: matte black |
 |
| Starting in model year 1980: Body Color-keyed Matte Black is omitted |
EXHAUST DRAIN
 |
| Until March 1978, terminal elbow |
 |
| Since March 1978, with the right terminal |
REAR LIGHTS LIGHTING PLATE
 |
| Up to model year 1980 |
 |
| From model year 1981 |
TOOL BOX ON THE REAR TRUNK
 |
| Up to model year 1977: the dark gray plastic |
 |
| From model year 1978: a lighter color |
INSIDE THE REAR WHEEL
 |
| Up to model year 1981: with sound damping, textured |
 |
| Model year 1982 and 1983: no sound damping texture used |
PREPARATION FOR THE INSTALLATION OF REAR HEAD RESTRAINTS ON REAR CROSS IN THE TRUNK

 |
| Until the 1978 model year: none |
 |
| From model year 1979 |
SUPPLEMENTAL LIGHTING OF THE TRUNK
 |
| Until the 1979 model year: none |
 |
| From model year 1980 for 315, 316, 316 1.8, 318, 318th: new form of sheet metal and light away |
 |
| From model year 1980 for 320 323rd M60: a new form of sheet metal and light connected to the opening of the boot/trunk |
TRUNK TRIM/CARPET
 |
| Up to model year 1979 |
 |
| From model year 1980 |
COVER FOR THE SPARE TIRE
 |
| Up to model year 1976 |
 |
| From model year 1977 |
SUN VISORS
 |
| Up to model year 1980 |
 |
| Starting in model year 1981 |
SUN VISOR CLIPS
 |
| Up to model year 1980: light beige |
 |
| Starting in model year 1981: dark beige color |
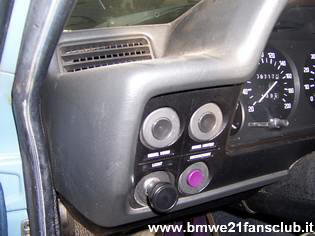
CONTROLS OF LIGHT AND REAR HEAT SWITCH
 |
| Model year 1976 and 1977: the switches are set to be written in German. From left, top, switch with indicator light for the fog lights (optional) rear fog lamp switch with indicator light (on request), connecting rod switch for lights and heated rear window switch with indicator light. In this case, the car is not equipped with fog lights and rear fog light switches and their caps are replaced by black deletes |
 |
| Model year 1978: a new knob for the light switch. In this case, the car is equipped with fog lights and rear fog |
 |
| From model year 1980, appears a swivel nozzle for air conditioning and switches, identified by the international, become three. From left: switch rod for position lights, switch to green to black with heated rear window, pull switch for fog lights (optional) and rear fog lights (optional for 315) |
 |
| For 315 with standard equipment: the linkage switch for fog lights and rear fog light is replaced by a black cap |
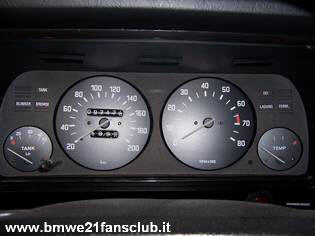
INSTRUMENTATION
 |
| EURO - Model year 1976, marked by lights and tools written in German, the indicator lights of the reserve is in the group on the left and the tachometer (optional for 316 and 318) has the area of the red line indicated by a small red mark. In specimens with no tachometer in its place there is the analog clock |
 |
| EURO - Model year 1977 and 1978: indicators and tools identified by the international |
 |
| EURO - Model year 1979: the light of the reserve is incorporated in the indicator of the level of fuel, two separate lights for the brakes (handbrake on and failure), the tachometer (optional for 316 and 318) has the area of the rev indicated by a red mark extended |
 |
| EURO - From model year 1980, otherwise the lights and the tachometer (when present) incorporates a digital clock and the area of economic regimes indicated by a small green mark. In specimens with no tachometer in its place there is the analog clock. Below the instrument, the thermometer at the water, there are buttons to adjust the digital clock if available, or a black cap |
HAZARD SWITCH
 |
| Until March 1976 (only for cars destined to Italy): not present. The placement of the hazard switch is located below the instrument, at the water temperature, and the seat control switch hidden by a fake black switch, the same as those found on cars without fog lights |
 |
| From March 1976 to model year 1979 (only for cars destined Italy): present electrical system, wiring and switch, instead of the red button command, a black cap inhibits its function, easily replaceable with the red switch |
 |
| Up to model year 1979 (for all other markets): switch with red button with no symbol |
 |
| From model year 1980: smaller red push-button, with the international symbol, placed between the air conditioning vents in center console |
AIR CONDITION DUCT AT DASH
 |
| Up to model year 1979 |
 |
| Starting in model year 1980 |
CENTER CONSOLE
 |
| Model year 1976 and 1977. On vehicles without a tachometer, a clock is built into the equipment and location in the center console is hidden by a black cap |
 |
| Model year 1978 and 1979, new air conditioning knobs levers of the switch of the fan and lighter, and written command horizontally |
 |
| From model year 1980: the air conditioning controls consist of three knobs and a lever, all written in German are replaced by international symbols, there are two adjustable vents for climate control and the switch dell'hazard; has shifted to the lighter the right of the ashtray |
 |
| Up to model year 1979: no lighter |
 |
| Starting in model year 1980: the right of the ashtray with cigarette lighter |
 |
| Up to model year 1979, with two control knobs |
 |
| From model year 1980, with a control knob (right) and lighter |
 |
| Since January 1976, with ribs |
 |
| Starting in model year 1980: smaller and with ribs |
STEERING WHEELS
 |
| 316, 318 and 320 model year 1976: four races with a crown of rigid plastic (*) |
 |
| 320th model year 1976: with padded crown (optional for other models) |
 |
| A three-spoke sport steering wheel covered in leather with crown for model year 1976 and 1977 |
 |
| Three-spoke sport steering wheel covered in leather with crown available in the Aftermarket Accessory Line "BMW Motorsport" until September 1979 |
 |
| Starting in model year 1977: Crown padded standard on all models and new cushion central emblem bigger |
 |
| Starting in model year 1978, upon request, three-spoke sport steering wheel covered in leather with crown (with a different design of the races) |
 |
| Since September 1979, three-spoke sport steering wheel covered in leather with crown available in the Aftermarket Accessory Line "BMW Motorsport" |
 |
| Starting in model year 1980, four-spoke steering wheel on request with a crown covered in leather |
TURN SIGNAL INDICATOR
 |
| Up to model year 1978 |
 |
| Starting in model year 1979 |
GLOVE COMPARTMENT
 |
| Up to model year 1978: option available on request |
 |
Starting in model year 1979: standard on all models
|
SHIFTER, BOOT AND KNOB
 |
Starting in model year 1979: standard on all models
|
 |
Model year 1980 and 1981
|
 |
| From model year 1982 |
 |
With automatic transmission
|
LEVER HAND BRAKE
 |
Until January 1976
|
|
 |
As of January 1976
|
INTERIOR DOOR PANELS
 |
| Model year 1976: all-imitation leather briefcase and without pockets (*). In this case the car is equipped with electric exterior mirror, then there is the corresponding control switch near the armrest |
 |
Model year 1977: added card holder pockets
|
 |
| From model year 1978 to model year 1980, model year 1981 and also 1982 to 1.8 and 316 318th: all-synthetic leather. The control switch of the electrically adjustable exterior mirrors, when present (as in this case), is newly designed and placed as high as |
 |
Starting in model year 1981 for 320 323rd M60: the central part with velvet, leatherette seats in the cars, the central part of the panel is coated with the same material
|
 |
| For 315: entirely without artificial leather pockets and briefcase. On specimens equipped with electrically adjustable exterior mirrors (optional), the control switch is located as 1.8, and 316, 318... |
SAFETY BELTS [FRONTS]
 |
| Up to model year 1977, at the center pillar |
 |
| Starting in model year 1978: more advanced and jointed bracket |
CENTRAL FRONT SEAT BELT RECEIVERS
 |
| Up to model year 1978 |
 |
| Starting in model year 1979, with the seat block |
FRONT SEAT LONGITUDINAL ADJUSTMENT LEVER
 |
| Up to March 1978: out of the seat near the door |
 |
Since March 1978, under the seat, on the inside
|
TIPPING LEVER FOR REAR SEAT ACCESS
 |
| Model year 1976: None Found |
 |
Starting in model year 1977
|
FRONT HEADREST
 |
| Until March 1981, with "ears" on either side |
 |
| Since March 1981: smaller, without 'ears' on either side |
INTERIOR HEADLINER
 |
| Up to model year 1980 |
 |
| From model year 1981 |
REAR SEAT BELTS
 |
| Model year 1976: with no roller |
 |
| Starting in model year 1977: includes retraction reel |
REAR HEADREST
 |
| From model year 1979 to March 1981: the "ears" on either side |
 |
| Since March 1981: smaller, with the top right |
FRONT SPOILERS
 |
| Hartge front valance with Euro-Front bumper |
 |
| Alpina Front Spoiler with Euro-Front Bumper |
|
|
|
|
|
|
|
|
|
| |
|
|
|
|
|
|
|
|
|
|
|
|
|
|
|
|
|
|
|
|
|
|
|
|
|
|
|
|