a divorce forced me to sell the house i have lived in for over 20 years, this all took place while during the dis-assembly of the 1977 e21 that my son and i drove home from california where the car was raised and lived it 'sheltered' life...in the mist of this dis-assembly as you can image i have cardboard boxes and plastic containers filled with bmw stuff...my son and i loaded the car onto a car hauler several weeks ago and moved it to its new home...a 1 small one stall garage...in that move i have misplaced more than i've wanted too....but after some settling last week i jacked the car back up and placed the frame on jack stands in an attempt to finish the required work on the sub-frame, drive train, brakes, and wheel bearings...over the last few days i began to focus on the disc brakes from the newly restored 323i trailing arms...the motivation for restoring and upgrading to the 323i trailing arms was 2 fold...like the earlier model e21 the 323i has an upgraded braking system to accommodate the larger engines...in the case of the 323i another upgrade that is not commonly discussed is the increased size of the wheel bearings...this becomes important to tuners because many of us utilize larger wheels on our cars...and the jump from 13' wheels to 15" wheels in theory and practically increase the pressures applied to the wheel bearings as you can imagine..i replaced the wheel bearings, grease seals, and associated parts on my 323i trailing arms...the pictures below are of the 323i disc brakes...(but just for the record, i am of the opinon that wheel bearing increases are NOT a reason to upgrade to 323i trailing arms...the rear disc brakes are however are a good reason if you don't want to weld in the appropriate plate/brackets to hold disc brakes...
The picture above is a rear 323i disc brake that came with the 323i trailing arms i bought...these brakes are in reasonably good condition as you can see in the pictures...notice that the rubber piston seals are intact and still in good working order and could have been installed without replacement but while they are off of the car it makes sense to restore them...
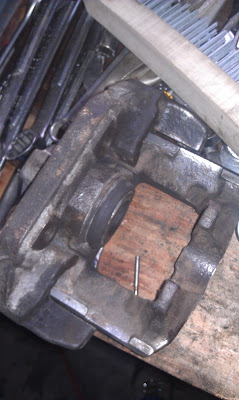
if you look closely at the brake caliper in the picture above you may notice that the retaining spring that holds the 2 halves together has been broken off...this happened as i attempted to remove the clip...i broke 2 tapered punches trying to free the spring...usually these springs just slide into the holes and are held in place by the spring's pressure...this one was a BEAR...
...in the picture above you can see the backside of the caliper with the broken spring still in place...
...the caliper was taken apart...and as you can see...that's the first broken punch tip at the center!!!
...in my opinion, one of the most important aspects to rebuilding disc brakes is the condition of the brake piston, and the walls of the sleeve...in the case of this brake the piston is smooth, no scaring or scoring of either the piston walls, or the piston itself...for my purposes that means this brake is rebuildable and not scrap...
...as you can see...the 35 yrs or so of service has allowed sentiment, and crud to settle in the closed system...i am in the truest sense of the word only a weekend mechanic and my "poor boy" ways learned as a kid in my dad's garage never took things like this seriously...for me this was a lesson in maintenance...the interior walls of this disc brake will NOT be honed because the walls are in perfect condition as is the piston...with the new seal kit the rubber piston ring will seal nicely and fit/slide smoothly...
...this is the best picture i could get of the interior walls of the sleeve...notice the retention ring, the rubber seals have been removed...crud is still in place however!
...after dis-assembly and cleaning the caliper with solvents, a wire brush, and a wire wheel in preparation for paint, i fit the brake back onto the trailing arm bracket. notice the NOS dust shield...new parts are sexy!
...if you look at this picture closely...you'll see this was my best attempt to fix the retaining spring stuck inside the brake caliper...i thought i would be "smart" and put the caliper in my drill press, squared, and level i tried drilling out the spring fragment...what i DID NOT anticipate was the differences in metal hardness...when i tried drilling the spring out the drill bit shifted and the result was that the drill bit slid into the caliper avoiding the harder spring steel...thus creating another hole in the caliper!!! ugh...unanticipated result for sure...but confirmed i'm only an amateur...
...this picture illustrates the "second" hole that resulted...i am anticipating using that hole to install the new retaining clip...it will be tilted off angle somewhat and certainly not what i wanted...but...
...cleaned and painted...
...second half of the caliper cleaned and painted...is it my imagination or do those holes seem to stick out in this picture...lol...
..what is pictured above is the rubber boot included in the 323i rear disc brakes rebuild kit...specifically, the rubber seal inside the brake sleeve, the piston, the rubber boot, and the outer snap ring protecting the piston and associated parts for being contaminated with dirt and grit which eventually will deteriorate the inner rubber seal between the piston inside the brake...
...believe it or not getting this rubber boot to fit correctly down into the piston was the most difficult aspect of this assembly...
...finally, the boot fitted down inside the piston and the snap ring is installed...
...the pads were fitted to the brake pad mounting pins (seen unseated)...
...ok, the first one is finished...but, as you can see i didn't have the vent/airator but its on order.


No comments:
Post a Comment